That high-pitched squeal coming from your dryer isn’t just annoying, it’s your machine telling you something specific is wearing out. A squeaky dryer almost always points to one of a handful of parts, and figuring out which one saves you time, money, and an unnecessary service call.
This guide walks you through how to identify the source by sound alone, what each cause looks like up close, and what it costs to fix.
What a Squeaky Dryer Is Actually Trying to Tell You
Before you start pulling panels off your dryer, it helps to understand why this noise matters and what it usually means.
Squeaking Is a Warning Sign, Not Just Background Noise
A squeak means metal, rubber, or plastic parts are rubbing together without enough lubrication or support. Left alone, that friction wears the part down further and can eventually lead to a bigger, more expensive repair.
Why This Is a Frequent Call for Fallbrook Homeowners
We hear this complaint often from homeowners across Fallbrook, usually starting as a faint noise that gets progressively louder over a few weeks. By the time most people call, the sound has become impossible to ignore, though catching it earlier almost always means a simpler fix.
What This Guide Will Help You Identify Before You Call for Service
This guide covers the four most common mechanical causes of dryer squeaking: worn rollers, a failing belt, a bad idler pulley, and worn drum glides or bearings, along with a few less common causes worth ruling out first.
How to Narrow Down the Source by Sound and Timing
The exact character of the squeak often tells you more than you’d expect before you even open the dryer.
High-Pitched Squeal vs. Rhythmic Chirping vs. Scraping Sound
A sharp, high-pitched squeal typically points to a dry roller or bearing. A rhythmic chirping that repeats at a steady beat usually means an idler pulley bearing. A lower-pitched scraping sound is more consistent with worn drum glides.
Does the Noise Match Drum Speed or Belt Speed?
Listen closely to whether the squeak repeats at the same pace as the drum turning or faster, matching the belt’s movement around the pulleys. A noise tied to belt speed rather than drum speed points toward the pulley or belt rather than the rollers.
Front of the Dryer vs. Back of the Dryer: Why Location Matters
Support rollers sit at the back of the drum, while the idler pulley and drive belt are usually accessed from the front. Standing next to the dryer while it runs and noting whether the sound seems louder from the front or the back narrows your search considerably.
Louder With a Full Load vs. Constant Regardless of Load Size
A squeak that gets noticeably louder with a full load often points to rollers or drum glides, since more weight increases friction at those contact points. A squeak that stays the same regardless of load size is more likely coming from the belt or pulley.
Cause 1: Worn or Dry Support Rollers
Support rollers are one of the most common sources of dryer squeaking, and they’re also one of the easier parts to inspect yourself.
What Support Rollers Do and Where They’re Located
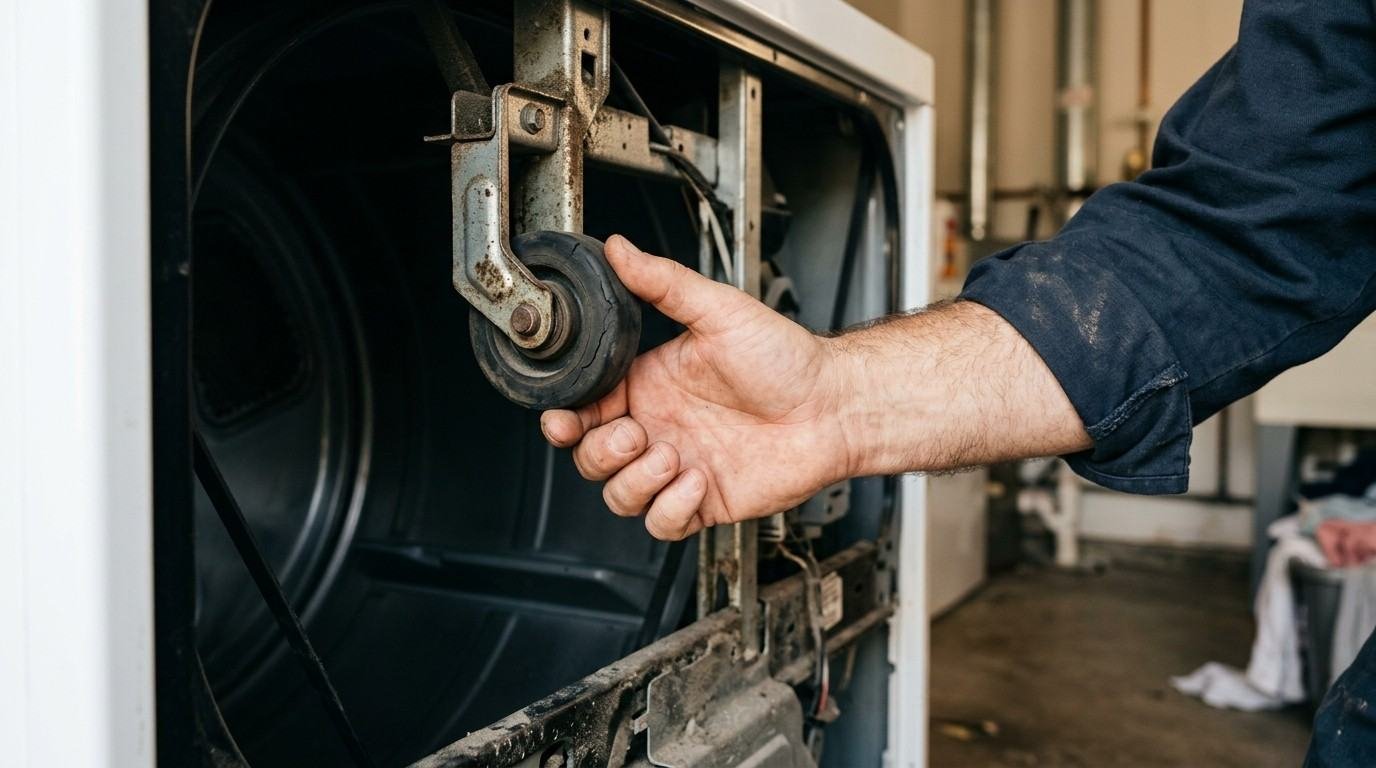
Support rollers sit on either side of the back wall inside the dryer cabinet and hold the drum up as it spins. Over time, the rubber wears flat or the shaft dries out, both of which create friction and noise.
Build quality varies between manufacturers here, which is one more reason it’s worth comparing options if you’re shopping for a dryer built for the local climate.
How to Spin-Test a Roller for Squeaking or Wobble
With the dryer unplugged and the rear panel removed, spin each roller by hand. A roller that squeaks as it turns or wobbles noticeably on its shaft is a clear sign of wear.
Lubrication vs. Full Roller Replacement: How to Tell Which You Need
If the roller shaft is dry but the rubber itself still looks round and intact, a small amount of high-temperature grease applied to the shaft, not the rubber surface, can quiet the noise. If the rubber is cracked, flattened, or worn smooth, lubrication won’t help, and the roller needs full replacement.
Cause 2: A Worn or Cracking Drive Belt
The drive belt is what actually spins the drum, and a worn belt produces one of the more distinctive squeaks in this whole list.
How the Drive Belt Connects the Motor to the Drum
The drive belt wraps around the motor pulley, the idler pulley, and the outside of the drum itself, transferring the motor’s spin into drum rotation. This is a long, continuous loop, so wear anywhere along its length can affect the whole system.
Signs of Belt Wear: Cracking, Fraying, and Glazing
Inspect the belt for visible cracks, frayed edges, or a shiny, glazed surface where it contacts the pulleys. Any of these signs mean the belt has lost grip and is due for replacement.
Why a Failing Belt Often Squeals Loudest at Startup
A worn belt frequently squeals most at the very start of a cycle, when the motor first engages and the belt has to overcome static friction before settling into smooth rotation. If the squeal fades slightly once the drum is up to speed, a failing belt is a strong suspect.
Cause 3: A Failing Idler Pulley
The idler pulley is a small but important part, and its bearing wearing out is one of the most common squeak sources reported by appliance technicians.
What the Idler Pulley Does to Keep the Belt Under Tension
The idler pulley is a spring-loaded wheel that presses against the drive belt to keep it taut, allowing it to properly grip both the motor pulley and the drum.
The Distinctive Chirping Sound of a Worn Pulley Bearing
When the pulley’s internal bearing wears down, it tends to produce a sharp, chirping squeak that repeats in rhythm with the belt’s movement rather than the drum’s rotation, which is one of the clearest identifying signs on this list.
How to Manually Test the Idler Pulley for Play or Roughness
With the dryer unplugged and the front panel removed, spin the idler pulley by hand. Roughness, resistance, or a grinding feel as it turns confirms the bearing has failed and the pulley needs replacement.
Cause 4: Worn Drum Glides or Bearings
Drum glides are easy to overlook since they’re small, but their wear pattern produces a noticeably different sound than the other causes.
What Drum Glides Are and Why They Wear Down Over Time
Drum glides are plastic or nylon pads lining the front of the drum opening where the drum’s edge rests against the front bulkhead. They let the drum slide smoothly as it rotates, and like any wear part, they thin out gradually with use.
The Scraping Sound That Signals Glide Wear vs. a Sharper Bearing Squeal
Worn glides tend to produce a continuous scraping sound throughout the cycle, often slightly lower-pitched than a roller or pulley squeak. A drum bearing issue, by contrast, tends to sound sharper and more consistent regardless of drum position.
Why This Cause Often Gets Mistaken for a Roller Problem
Because both drum glides and support rollers involve the drum’s movement, homeowners frequently assume a scraping sound means the rollers when it’s actually the front glides. Checking both the front and rear of the drum before ordering parts avoids this common mix-up.
Other Causes That Aren’t Rollers or Belts
A handful of squeaks trace back to something simpler than a worn internal part, and it’s worth ruling these out first.
An Unlevel Dryer Rubbing Against a Wall or Cabinet
If your dryer isn’t level, it can vibrate and rub against a nearby wall or cabinet, creating a squeak that has nothing to do with internal components.
Use a level tool to check all sides and adjust the feet if needed, the same basic troubleshooting covered in our guide on stopping a washing machine from walking or vibrating, since the leveling process works the same way on both appliances.
Small Objects Stuck in the Drum or Blower Wheel
Coins, buttons, or other small items can get caught in the drum or work their way into the blower wheel housing, creating an intermittent squeak or rattle. Check the drum and lint trap opening for anything that shouldn’t be there.
A Loose or Worn Blower Wheel Housing
If the blower wheel itself becomes loose or starts rubbing against its housing, it can create a squeak similar to a worn bearing. This is a less common cause but worth checking if the more likely culprits come up clean.
DIY Diagnostic Checklist Before You Call a Pro
A structured check of the most likely parts helps you narrow the cause quickly instead of guessing.
10-Minute Rear Panel and Roller Inspection
Unplug the dryer, remove the rear access panel, and spin-test each support roller by hand, listening and feeling for squeaking or wobble.
Front Panel Belt and Pulley Check
With the dryer still unplugged, remove the front panel to inspect the belt for cracking or glazing and manually spin the idler pulley to check for roughness.
When Lubrication Is a Safe Temporary Fix vs. When It Isn’t
Lubrication works well on a dry roller shaft or pulley bearing that’s otherwise structurally sound. It will not fix a cracked belt, a flattened roller, or worn drum glides, since those require physical replacement rather than reduced friction.
Warning Signs That Mean Stop Using the Dryer Immediately
If you notice a burning smell, smoke, or the drum struggling to turn along with the squeak, stop using the dryer and have it inspected before running it again. A burning smell in particular can point to something more serious, similar to the airflow-related risks covered in our dryer vent fire safety guide.
Repair Costs: Rollers, Belts, and Pulleys in 2026
Costs vary by part and by how much disassembly is required to reach it, but knowing rough ranges helps you plan ahead.
Support Roller Replacement Cost
Support rollers are a relatively inexpensive part, and replacement including labor typically falls on the lower end of dryer repair costs, especially since both rollers are often replaced together.
Drive Belt Replacement Cost
Drive belt replacement is a moderate-cost repair, since the job usually requires opening both the front and rear of the cabinet to rethread the new belt correctly around the drum and pulleys.
Idler Pulley Replacement Cost
Idler pulley replacement is typically an affordable repair on its own, though it’s frequently done at the same time as a belt replacement since both parts are already accessible once the cabinet is open.
Why These Parts Are Often Replaced Together
Because reaching the belt, pulley, and rollers usually requires similar disassembly, many technicians recommend replacing all three at once if any one of them shows significant wear, since the labor cost of a second visit later often exceeds the cost of the parts themselves.
DIY Fix vs. Calling a Professional
Some of these repairs are approachable for a confident homeowner, while others benefit from a professional’s experience with full disassembly.
Repairs Straightforward Enough for Most Homeowners
Lubricating a dry roller shaft or idler pulley bearing is a simple task most homeowners can handle safely with basic tools.
Why Roller, Belt, and Pulley Jobs Often Require Full Disassembly
Replacing rollers, belts, or the idler pulley usually means removing the drum entirely, which involves disconnecting wiring harnesses and reassembling everything correctly afterward. This level of disassembly is where a professional’s experience meaningfully reduces the risk of reassembly mistakes.
When a Persistent Squeak After Repair Signals a Different Problem
If a squeak continues after replacing the belt and rollers, the cause is often a worn drum glide or bearing that wasn’t addressed in the original repair, which is worth mentioning to your technician if the noise returns.
If your dryer is older and has needed several repairs like this, it’s worth weighing that against the same repair-or-replace reasoning that applies to an aging refrigerator.
Preventing Squeaks From Coming Back
A few simple habits reduce wear on these parts and extend the time between repairs.
Routine Lubrication and Inspection Schedule
Check your rollers and idler pulley for dryness once a year and apply high-temperature grease as needed to keep these parts moving smoothly.
Why Overloading Accelerates Roller and Belt Wear
Consistently overloading your dryer puts extra strain on the rollers, belt, and pulley with every cycle, which accelerates wear across all three parts at once.
Keeping Your Dryer Level to Reduce Unnecessary Strain
An unlevel dryer creates uneven pressure on the rollers and drum bearings over time, so checking and adjusting the leveling feet periodically protects these parts and prevents unnecessary wear across the whole system.
Why Choose a Local Fallbrook, CA Appliance Repair Team
Working with a local team means faster, more accurate diagnosis instead of replacing parts by trial and error.
Accurate Sound-Based Diagnosis Instead of Guesswork
A technician who knows what each type of squeak sounds like can often narrow down the cause before ever opening the cabinet, saving you both time and unnecessary part costs. This kind of experience is part of why homeowners across Fallbrook keep choosing the same local team for repairs like this one.
Certified Technicians for All Major Dryer Brands
Our technicians repair rollers, belts, pulleys, and drum glides on dryers from all major brands, along with heating components and other issues covered in our guide on diagnosing a dryer with no heat.
What a Full Noise Diagnostic Visit Includes
A thorough visit includes inspecting the rollers, belt, idler pulley, and drum glides, along with checking the dryer’s level and airflow, since restricted airflow can stress these parts over time as well. If your dryer has developed a squeak, Appliance Repair Fallbrook can identify the exact cause and fix it. Contact us to schedule a diagnostic visit.