You open the fridge and the milk feels a little warmer than it should. The ice cream in the freezer feels soft around the edges. You turn the temperature colder, but the problem does not go away. You might even notice the sides of the refrigerator feel hot.
Before you assume the refrigerator is dying, you should check one simple thing. The condenser coils.
Dirty condenser coils are one of the most common reasons a refrigerator runs warm and uses more electricity than it should. Cleaning them is one of the highest-value maintenance tasks you can do on any fridge. It takes a bit of time, but it is not complicated once you know where everything is and how to do it safely.
As a Southern California appliance and HVAC repair company, Appliance Repair Fallbrook sees this issue every week during home appliance repair calls. You can often prevent bigger breakdowns by keeping those coils clean.
This guide gives you a clear, step-by-step process, plus some advanced tips so you can handle this the right way.
If you want to see our full service range and local focus, you can start on the Appliance Repair Fallbrook homepage.
Why dirty condenser coils matter
Your refrigerator works by moving heat. The compressor and refrigerant pull heat out of the food compartment and send that heat to the condenser coils. The coils then release that heat into the air around the fridge.
When those coils are covered in dust, pet hair, and kitchen grease, they cannot release heat efficiently. The compressor has to run longer and harder to maintain the same interior temperature. That creates three problems:
- The fridge runs warm or struggles to cool.
- The fridge uses more energy, which means higher power bills.
- The compressor wears out faster, which can lead to expensive repairs.
Energy efficiency guides and home maintenance resources consistently list coil cleaning as a key DIY project that improves both performance and efficiency.
How condenser coils work (plain-English explanation)
Inside your fridge, refrigerant absorbs heat from the food compartments through the evaporator coils. The compressor then pumps the hot refrigerant to the condenser coils. The condenser coils are usually outside the insulated compartment. They can be:
- A exposed coil grid on the back of older fridges.
- A set of tubing and fins underneath or behind a panel on newer units.
As air moves over these coils, the refrigerant gives up its heat, cools down, and flows back to start the cycle again.
If you stuff dust and hair between those fins, you create a blanket that traps heat. That pushes your fridge into overtime.
Signs your condenser coils are dirty
You probably will not crawl behind your fridge every month. Instead, you react to symptoms.
Common signs include:
- The fridge feels warmer than usual, even though the thermostat setting has not changed.
- The compressor or fan seems to run almost all the time.
- The sides or top of the fridge feel very warm or even hot.
- You see visible dust or pet hair trapped on the coil area when you look underneath or behind the fridge.
- Your electric bill goes up without a clear reason.
If you also notice water around the fridge, you might have a separate issue. In that case, see our detailed guide on why your refrigerator might be leaking water before you do anything else.
How often you should clean refrigerator coils
There is no single number that fits every home, but experts and manufacturers give good ranges.
Most guidance suggests:
- At least once a year for average homes.
- Every 3–6 months if:
- You have pets that shed.
- Your home is dusty.
- Your kitchen has a lot of foot traffic or nearby doors.
In Southern California, homes often have open windows, nearby yards, and pets. That means more dust and hair in the air. If you can, check your coils twice a year and clean them when you see buildup.
Safety first: prep steps before you touch anything
Before you start coil cleaning, take a few simple safety steps.
- Unplug the refrigerator.
This protects you from electrical shock and keeps the compressor and fan from starting while you work. - Protect the floor.
If you plan to pull the fridge out, place a piece of cardboard or a moving mat under the front edge to protect the flooring. - Gather basic tools.
You will want:- A vacuum with a crevice tool or brush attachment.
- A condenser coil brush or a long, narrow cleaning brush.
- A flashlight.
- A dust mask if you are sensitive to dust.
- Know where your coils are.
Check your user manual or look at the fridge:- Older units: coils may be a big metal grid on the back.
- Many newer units: coils are underneath, accessed from the front (through the toe grille) or from the back (rear access panel).
If you are unsure, you can look up the model online or ask a technician during a home appliance repair visit.
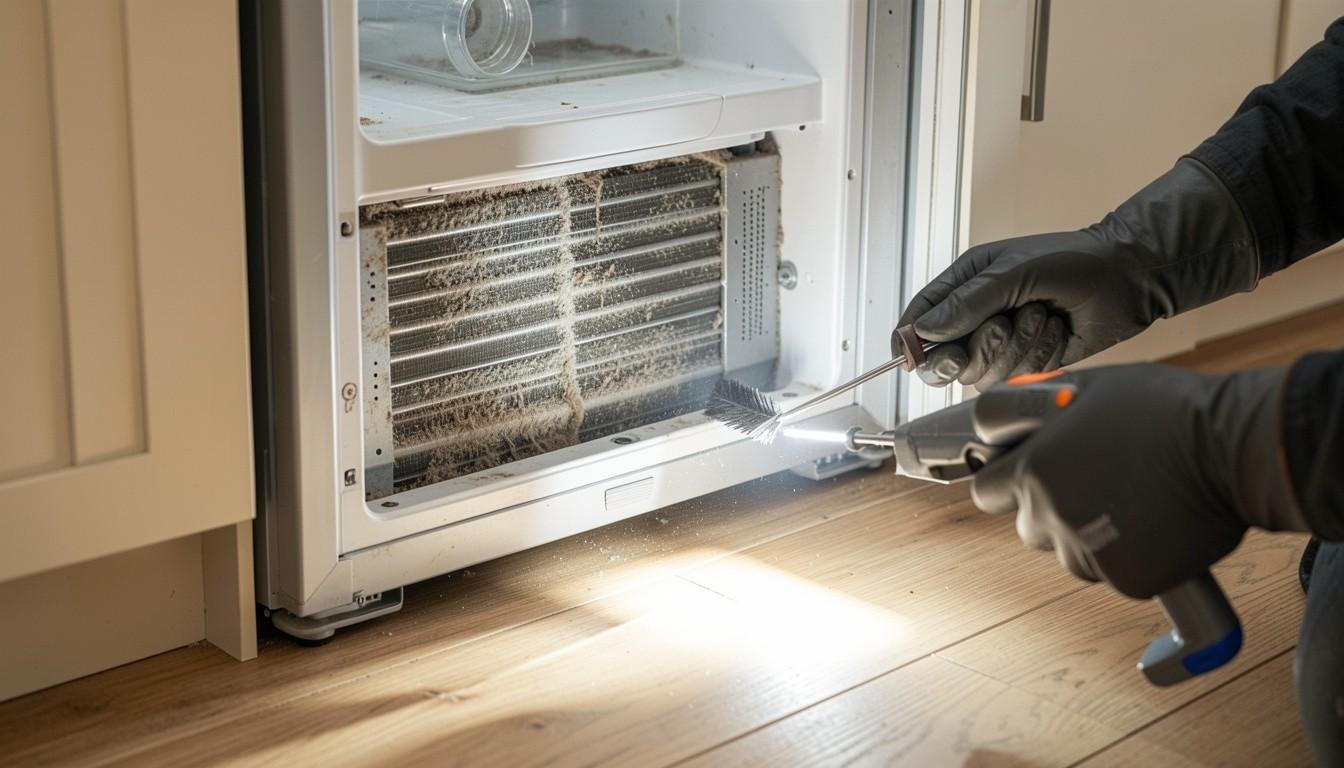
Step-by-step: how to clean condenser coils
Now let’s walk through the process in a clear sequence.
Step 1: Access the coils
- Unplug the fridge.
- If coils are on the back:
- Carefully pull the fridge away from the wall.
- Make sure you do not kink the water line if you have an ice maker.
- If coils are underneath:
- Remove the front toe grille by gently pulling it off.
- In some models, you may need to remove a back cover panel instead.
Use a flashlight to locate the coils. They may look like:
- A black metal radiator-style assembly.
- A set of tubes running through thin metal fins.
Step 2: Vacuum loose dust
Use your vacuum with a crevice tool or brush attachment:
- Gently vacuum the surface and surrounding areas.
- Try not to bang into fins, wiring, or small components.
You will likely see a surprising amount of dust, hair, and lint. Take your time and let the vacuum do the work.
Step 3: Brush the coils
Use a condenser coil brush to get dust out from between the fins and around tight spots. These brushes are long and narrow, designed to reach where the vacuum cannot.
- Insert the brush along the coil, moving in the same direction as the fins.
- Pull dust outward so the vacuum can pick it up.
- Avoid pushing dust further into hidden areas.
Alternate between brushing and vacuuming until the coils look much cleaner.
Step 4: Clean the surrounding area
Dust and dirt will fall onto the floor and surrounding surfaces.
- Vacuum underneath and behind the fridge.
- Wipe the toe grille or access panel with a damp cloth.
- Inspect for any signs of leaks or damage while you are back there.
If you see signs of water damage or corrosion around a water line, review our refrigerator leak guide or consider a service visit.
Step 5: Reassemble and restart
- Reinstall the toe grille or rear panel.
- Carefully move the fridge back into position without crushing hoses or the water line.
- Plug the fridge back in.
Give the refrigerator several hours to stabilize. You should notice:
- Quieter operation.
- Cooler interior temperatures.
- Less heat on the sides and top.
What you should never do when cleaning coils
There are several shortcuts that cause more harm than good.
Do not use a pressure washer
High-pressure water can bend fins, push water into electrical components, and cause rust. Coil fins are thin and easy to damage.
Do not use harsh chemicals
Strong cleaners, solvents, or degreasers can damage coatings, plastics, and wiring. Mild cleaning methods are enough for domestic refrigerators.
Do not scrape with metal tools
Avoid screwdrivers, knives, or any metal scraping tools. They can:
- Puncture tubing.
- Damage insulation.
- Bend fins permanently.
Be careful with compressed air indoors
Blowing out coils with compressed air can work, but it often blasts dust all over your kitchen and into the air. If you use compressed air, do it gently and be prepared for thorough cleanup.
How clean coils help your fridge and your wallet
Cleaning condenser coils does more than fix a warm fridge. It also helps:
- Reduce energy use. Studies and field experience show that dirty condenser coils can significantly increase energy consumption because the compressor runs longer.
- Extend compressor life. When the compressor does not run as hard and as long, it experiences less heat and stress, which can delay failure.
- Maintain stable temperatures. Your food stays safer when the fridge can maintain consistent cooling.
Energy efficiency guides list coil cleaning as one of the easiest DIY projects to save energy in a home. This ties into a broader repair trend. The home appliance repair service market continues to grow, partly because homeowners see maintenance and repair as smart alternatives to early replacement.
If you enjoy these kinds of practical home care tasks, you might also like our community-focused article on supporting local trades in Fallbrook, which includes how appliance repair fits into a local “home team” of pros.
When DIY coil cleaning is not enough
Sometimes, cleaning the condenser coils does not fully solve the warm fridge issue. That usually means there is another problem at play.
You should consider calling a professional if:
- The refrigerator still runs warm after a thorough coil cleaning.
- The compressor is very loud, bangs on start, or clicks repeatedly.
- The fridge short cycles or runs constantly.
- You cannot safely access the coils due to built-in cabinetry or complex design.
In those cases, a technician needs to check:
- Evaporator coil frosting.
- Thermostats and sensors.
- Fans (both evaporator and condenser).
- Sealed system pressures.
As an appliance repair company, Appliance Repair Fallbrook can pair coil cleaning with a full diagnostic visit. That way you get a clear picture of the fridge’s health instead of guessing.
If the fridge is older and has multiple issues, we also help you decide if repair or replacement makes more sense. If you are thinking about a new unit, our guide on best appliance brands for coastal and inland California homes can help you choose models that handle Southern California conditions better.
Preventive coil-care checklist for Southern California homes
You can build coil care into a simple preventive plan.
Twice a year (or more if you have pets)
- Vacuum the area near the base and back of the fridge.
- Check coil visibility. If you see matted dust, schedule a cleaning session.
Annually
- Perform a full coil cleaning as described above.
- Inspect the door gaskets and perform the dollar-bill test to ensure a good seal.
- Verify the fridge is level and doors close properly.
As needed
- After renovation dust or major home projects, check coils earlier.
- If you notice a warm fridge, oddly hot sides, or constant running, do not wait.
If you reach a point where the fridge is old, unreliable, or repeatedly failing, and you decide to replace it, our guide on local recycling centers for old appliances in Fallbrook helps you dispose of it responsibly.
How Appliance Repair Fallbrook fits into your home maintenance plan
Coil cleaning is one part of a larger picture. As a local appliance and HVAC repair company, we help you:
- Keep refrigerators, washers, dryers, and dishwashers efficient.
- Prepare and maintain HVAC systems for Santa Ana winds and heat waves, as explained in our HVAC preparation guide.
- Respond quickly to emergencies when comfort systems fail, as covered in our emergency AC response article.
If you want to add us to your “home team” of local trades, you can reach out and contact our team for a refrigerator performance check, coil cleaning, or a broader home appliance inspection.